
Macro Basics

The face of a Fringed Jumping Spider (Portia fimbriata)
Taking close-up photos of small animals (macro photography) is not too difficult, though some specialist equipment does help. I have always had a fascination with smaller animals, especially invertebrates, and find that taking close up photos gives me a window into their amazing world. It is a world where things are very different than those in our every day lives. Strange and bizarre features of these animals perform tasks in their lives which can be awe inspiring and terribly gruesome at times, but all serve to aid their survival. All becomes visible in the world of macro photography.
A good nature macro photograph is like any other good photo – it is interesting to look at. It may tell a story, it may be a simple portrait or it may be abstract in its appearance. It all depends on the result you are looking for. It always helps to have to have this in mind when you set out to take a photograph. One of the most important things in macro, as in all forms of photography, is the lighting. Poor lighting will let down the most spectacular subject (even using expensive equipment) and can ruin the potential of a good photo.

Praying mantises feeding make interesting and easy subjects to start with as they stay relatively still.
When it comes to macro photography, you can either use natural light (sunlight) or artificial light such as a flash. Although I occasionally use natural light, I almost always use flash as it provides a fast pulse of light that freezes the action of fast-moving animals, and avoids the blur caused by camera shake.

Natural light in the shade or on overcast days can provide a nice soft light which works well for subjects that are not moving like this Lichen Huntsman (Pandercetes gracilis). In most cases using natural light will require a tripod.
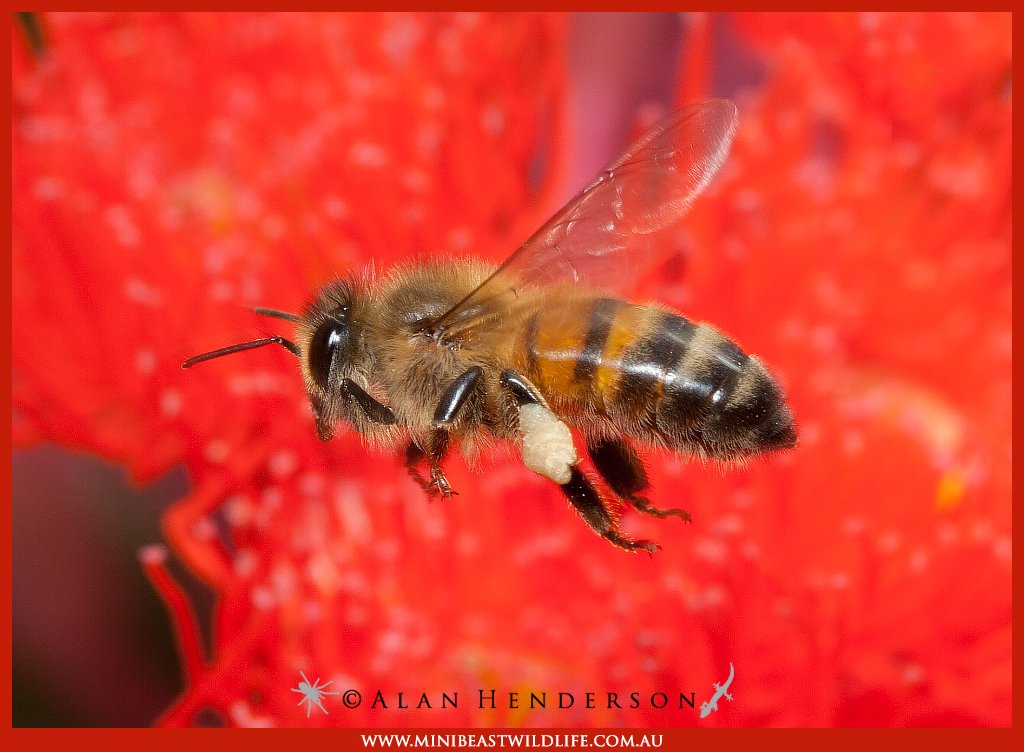
Using flash allows you to freeze motion and capture fast moving subjects without blur such as this Honeybee in flight.
Using flash also allows you to have more control over the aperture (controlling the amount of light the camera allows in for cameras with manual settings). The aperture is the adjustable ‘hole’ nestled inside the lens which can be changed to allow more or less light to pass through. Keeping it basic, these settings are called f-stops. It’s a little confusing at first as the larger the hole the smaller the f-stop number (eg. f2.8 is a large hole allowing lots of light through, whereas f22 is a small hole letting less light through). Closing down the aperture has the additional effect of providing a greater depth of field (a greater depth of acceptable focus within the image). The trade-off is this requires more light to achieve the correct exposure. Due to the physics of magnification in photography, the depth of field in macro is very shallow (ranging from several millimetres to a centimetre or two), so you have to be very careful about making sure your subject is in focus. Generally speaking, the best apertures to work with are f11 to f16 maximise your depth of field.

The image on the left was taken with a wider aperture and has less depth of field. Neither is right or wrong - having a greater depth of field can reveal more detail, and a shallow depth of field can place the emphasis of the image on a particular place.
Many of the new compact digital cameras have a macro function which allows the lens to focus on things quite close. The flash on these cameras is not ideally positioned for good close-ups, so unless you are photographing a subject which is quite still in bright sunlight (with a steady hand), things often don’t quite turn out perfectly. Using a tripod will eliminate camera shake, but it makes it quite difficult to follow any living animals around if they are on the move.
The method I use is quite simple. I use a digital SLR camera, a flash which is not physically connected to the camera, and a ‘soft-box’. A soft-box diffuses (spreads) the light coming from the flash and effectively makes the size of the light larger. This reduces the amount of shadow, just as a cloud passing in front of the sun does. Having the flash off the camera rather than mounted on top of it gives me a great deal of flexibility in where I place the light. I can put it above the animal, to one side or even behind it for more dramatic back-lighting effects.
No matter what brand or model of camera you have, this type of set-up can be achieved either by the camera itself or with some simple accessories. Some macro photographers prefer to have two flashes and some use a ‘ring-flash’, neither of which I personally like – two flashes give double highlights in eyes (not so natural) and two sets of shadows, while ring-flashes give animals a weird goggle-eyed appearance. Each to there own.
Another set-up that is becoming increasingly popular is having a large diffuser on the flash mounted on the camera’s hot shoe. This system works quite well for small subjects photographed close to the lens, and while the lighting is nice an diffused, it is always the same and does not allow for any adaptation to the scene or any creativity. Whatever camera you use or system you choose, below are some key tips for getting good macro photos:
Make sure the animal’s eyes are in focus (if they’re not, the whole picture appears out of focus)
Take the photo on a different angle than your normal everyday viewpoint (don’t just stand above the subject; crouch, kneel or lay down if you can).
Hold your camera very steady when you are about to take the photo (I hold my breath!)
Approach animals slowly and have patience. Watching them first to understand their behaviour patterns is a big help.
Crop and adjust the brightness, contrast and colour of your final images to bring out their full potential.
Have fun!